Professional Thumb Rest for Clarinet
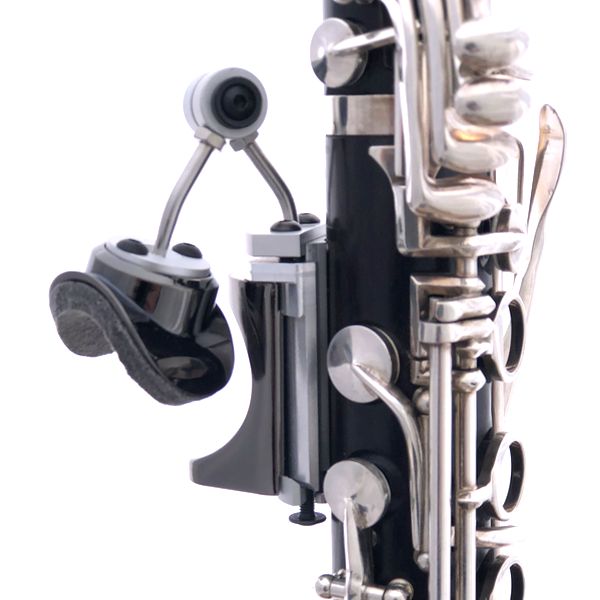
The Maestro Thumb Rest is the most sophisticated thumb rest that can be adjusted to the individual anatomy of every musicians hand and can be adjusted in all possible directions to meet the highest individual demands and ensuring an ideal hand position.
A direct and positive effect on the freedom of movement of the entire hand is found because of the improved position of the thumb in relation to the instrument. Especially of the ring finger and little finger.

Advanced features
Durable quality
The Maestro Thumb Rest is made of high quality metal parts and can be used for a lifetime.
Full Adjustable
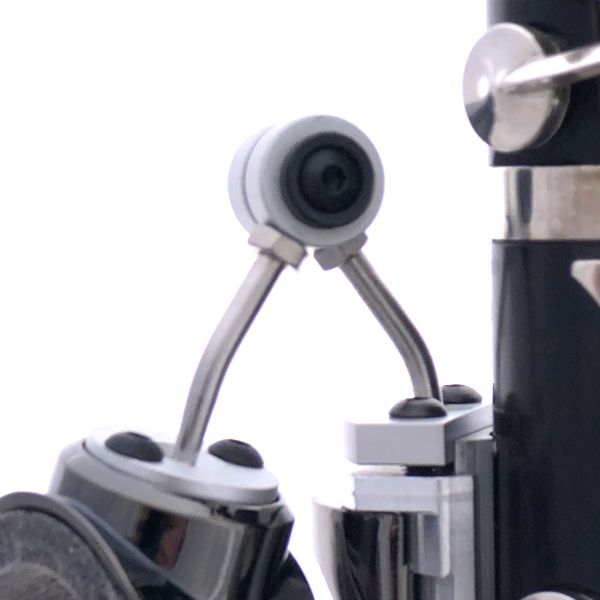
The padded thumb plateau is adjustable in all directions by means of two ball joints and a hinge joint.

Mount and play
Once properly installed and adjusted, the thumb rest does not require any further adjustment.
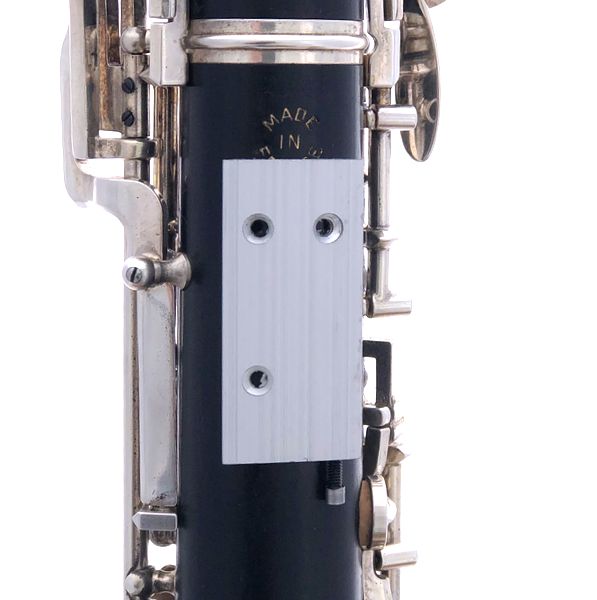
Mounting slide
Is delivered with two solid metal mounting slides to use one thumb rest on more instruments.
Ergonomics
The ergonomics of the Maestro Thumb Rest is based on a hollow casing that can be adjusted from right to left. In this way the hand is allowed to “open”. Adjustable in height on the mounting slide. The padded thumb plateau is adjustable in all directions by means of two ball joints and a hinge joint.
The Pressure point on the thumb is moved from the first phalanx to the space between the two joints of the thumb. The Lever momentum is much smaller at this new point, which makes carrying the weight far more easier than before and enables an easier reach of lower keys.

Effortless
In this way the situation moves towards YOU, your individual unique demands, instead of complying to a given one. Instead of “hanging in the tendons”, the musician will now carry the instrument in an “active” way!

Reviews
Marko Kmet
Hello Ton! I just thought it would be nice to drop you a line to tell you that we have received and started using the thumb rests you had sent. It really has proved to be an outstanding device! My son’s teacher is very much impressed and she said that his right hand position had started to improve almost immediately. He is also satisfied and can practice for a longer period of time and the tones from H1 to G2 no longer pose a problem. Thank you again for you cooperation and all the best in the future!
Marko Kmet Medical Specialist (Slovenia)
Anton
Greetings from the UK. It’s about twenty years since I last contacted you, to purchase two Maestro thumb rests (the first version). They’re still providing great service on my Rossi clarinets.
Christine Carter
Ton Kooiman’s Maestro thumb rest saved my career as a clarinetist. I had severe pain in my right thumb during the first year of my undergraduate studies and this was the only solution that made a difference. I have been using it ever since – for almost fifteen years now. Ton Kooiman is a brilliant engineer and we are all so lucky he has devoted his career to helping musicians in this way.
Christine Carter DMA , Assistant Professor of Single Reeds, Memorial University Canada
FAQ
empty first row
What are the ergonomic benefits of the Maestro Thumb Rest?
The Pressure point on the thumb is moved from the first phalanx to the space between the two joints of the thumb. The Lever momentum is much smaller at this new point, which makes carrying the weight far more easier than before and enables an easier reach of lower keys.
How to install Maestro Thumb Rest sliding plate?
The mounting slide of the Maestro Thumb Rest has three holes to fix it to the body. The upper two mostly coincide with the measurements of most Clarinets and Oboe’s. If not precisely, try to make the holes in the mounting slide a bit oblong, with a small round file ,and most of the times this will help. If not, one or two new holes have to be made at least. But the third hole below is always necessary to obtain a good solid fixation of the mounting slide. It is not a problem at all doing this. We have drilled thousands of holes and the little holes always can be filled practically invisible in case an instrument has te be sold without thumb rest. Drilling is done by hand by means of a hand vice and can thus be done very safely. Drill and screw one after another to prevent the mounting slide to shift.
How to mount Maestro Thumb Rest?
The Maestro Thumb Rest can be put on (and off) the instrument in a few seconds by sliding it on the pre-installed mounting slide. Once properly installed and adjusted, the thumb rest does not require any further adjustment.
How to adjust the Maestro Thumb Rest?
Adjusting the Maestro Thumb Rest is easiest in cooperation with you technician. To properly adjust the thumb rest, you should be able to fully relay your right hand. All moving parts of this complicated thumb rest can be adjusted by means of two Allan wrenches (included in the box). Wrench 1.5 mm for the little screw on the mounting slide and the 2 mm wrench for all the other parts. Please make sure the screws are unlocked before pushing one of the rods in another position. Most important is again that the tip of the thumb is slightly bent and that the thumb makes good contact with the casing in the hollow cavity. The sequence of adjustment is first the height (bottom thumb rest or at the mounting slide). Then the adjustment to the left, and then the ball joint on top, then hinge, and at last the padded thumb rest with the second ball joint. This adjustment can only be done well, when you hold the instrument approx. in playing position. E.g. sitting on a chair with the bell resting on your knees and holding the instrument with the left hand. This allows for a relaxed and joint neutral right hand to go onto the instrument in the new (your) position.
What about different hand sizes?
The Maestro Thumb Rest that can be adjusted to the individual anatomy of every musicians hand and can be adjusted in all possible directions to meet the highest individual demands and ensuring an ideal hand position.
How to get new felt on the thumb plateau?
On which instruments can the Maestro Thumb Rest be applied?
The Maestro Thumb Rest can be used on th following instruments:
- Oboe d’ Amore
- English horn
- The Maestro can be used on these instruments because of the wider diameter of the body of these instruments. Even the Oboe d’ Amore can be fitted best with the Maestro thumb rest. A musician needs two separate thumb rest when playing oboe and English Horn. (Due to the difference in angle of the hand/wrist).
- Alto, Basset, Clarinet
- The bass and alto Clarinets cannot be fitted with the Maestro thumb rest most of the time because of the thumb keys for the lower register.
- Recorder
Can the Maestro be used on a soprano saxophone?
No alas, this not possible to attach to this instrument. You do not need the padded thumb rest (for carrying you have the cord). And the house or casing is too high or thick. For this purpose we then designed and produced to Forza Thumb Rest.
Is it possible to attach a neck strap to the Maestro Thumb Rest?
Yes, you can easy attach the neck strap eye to the left ball joint arm. The solid Thumb Rest construction is suitable to support your instrument. In case of the Maestro Thumb Rest you may place the hook on the left ball joint arm just left of the hinge joint. This is not the case for the Oboe due to the higher position of the thumb rest.
Whats are the differences between Maestro and Oboe?
The Maestro Thumb Rests and Oboe Thumb Rests are virtually the same. Only two parts are different and that is the casing which can be turned to the left and right, and the actual padded thumb rest. (smaller on the Oboe Thumb Rest). The Padded thumb rest on the Maestro Thumb Rest has extended sides to improve ergonomics, but makes it a bit larger. Oboists most often like a smaller thumb rest on their elegant instruments. The two parts (padded thumb rest and casing) are interchangeable. We were asked to make a thumb rest especially for the double reed market. The Oboe Thumb Rest has a casing already machined at an angle, whereas the hollow cavity of the Maestro is machined straight. But both can be adjusted to left or right at an angle. So that the thumb can be slightly bent instead of pulled upwards or being sagged. For this the Oboe Thumb Rest casing allows for more adjustment to the left, to compensate for the smaller body of the Oboe Thumb Rest. The thumb points to the index finger at a sharper angle on the Oboe. When only a Maestro Thumb Rest is available you could use this thumb rest as well. The Oboe Thumb Rest looks and feels a bit smaller.
What about hyper mobility?
The Maestro Thumb Rests are developed especially for every hand or condition, but people with hyper mobility or double jointed thumb base have difficulty in maintaining the relaxed, joint- neutral position you want to have on the clarinet. So because the Maestro can be adjusted in many ways, it may sometimes be difficult to find the right position. The right position is very individual, but a golden rule is that for you this is your natural relaxed hand without “doing” anything. Joint neutral this is. People with hyper mobility however find it difficult to “maintain” this position as soon as they start doing anything like carrying their instruments. And tend to seek a extreme position as if they want to brace themselves. So when you adjust the Maestro, do this with the help of another person who can tighten the screws and adjust the thumb rest. Sit in the correct playing position, hold the instrument with your left hand, the bell resting on your knees. With your right hand you are doing nothing yet !!! No carrying. And fingers on the keys. Note well, normally the thumb is the reference point for the fingers. For now, when you are adjusting, you feel the fingers first and let the thumb follow towards your neutral position. You are putting the hand with the very relaxed musculature on the thumb rest again and again to adjust to THIS position. Then you know that this is your best individual hand position to carry the instrument. Your individual point of reference. The more affordable Etude3 is therefore sometimes easier to start with as this thumb rest “guides” you a bit more into the “right” position.
Most important is to know that the thumb has to be a little curved (like the bow of a bridge) pulling just a little the little muscle at the inside of the thumb. (The point of the thumb goes downwards instead of in the old way, upwards. 180 degrees different of what you are used to).
EN
Manual
NL
Manual
FR
Manual
IT
Manual
TUR
Manual